jeudi 12 décembre 2013

Petits carrés au chocolat

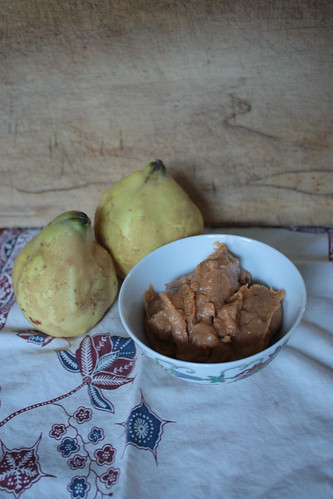
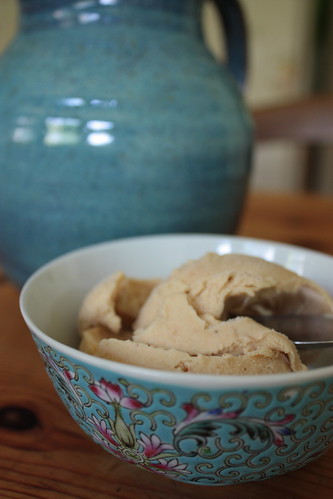
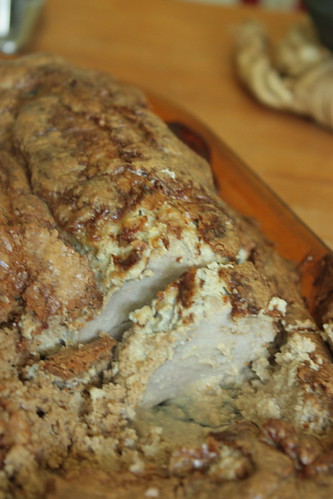
Ne nous reposons donc pas sur nos lauriers, il y  encore du gâteau de Noël (sans laurier, d'ailleurs) à publier ! Pour changer, c'est plutôt une recette à manger rapidement, du moelleux plutôt que du sec. Une fournée me fait un moule à gratin très grand format du grand suédois, si vous êtes peu nombreux ou de petits mangeurs je vous conseille de ne faire que la moitié.
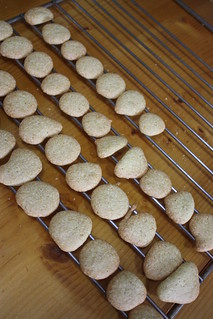
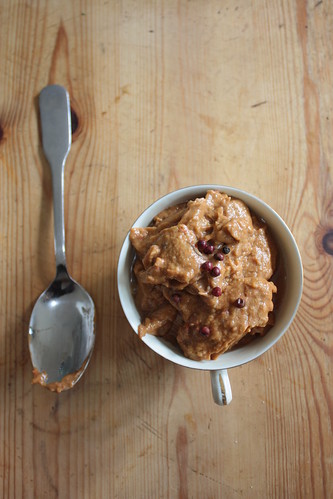
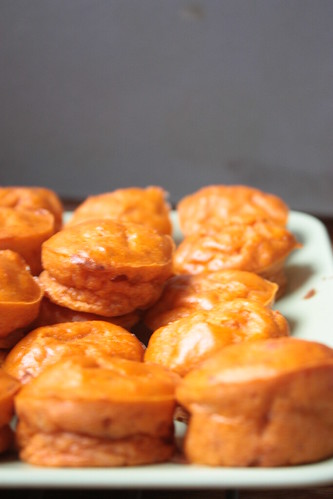
La recette d'origine était plus compliquée et comportait plus de beurre. Je l'ai dernièrement adaptée et simplifiée pour qu'elle ne soit pas trop longue à faire pour la capacité de concentration d'une enfant de deux ans, et le résultat est super ! Je l'ai aussi faite cuire plus longtemps que préconisé, la dernière fois ils n'étaient pas assez secs et se sont très mal gardés.

There's not time to rest, there are more Christmas cookies recipes to blog about ! For a change, here's one that should be eaten relatively quickly and does not need to be stored.
One batch fills one of my extra-large oven dishes from Ikea - if you don't want to make too much of this, I would advise you to halve the proportions.
 The original recipe includes quite a lot more butter and is more complicated. I simplified this time (so that baking time does not exceed one toddler's attention span) and left it longer in the oven - last year it was too moist and didn't store well as a result.

Petits carrés au chocolat
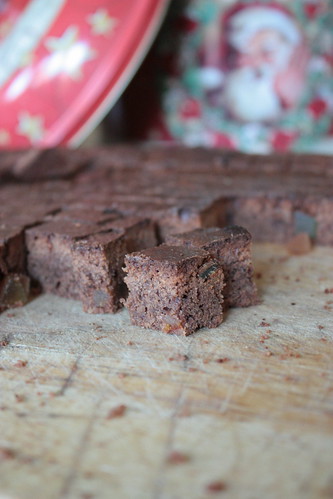
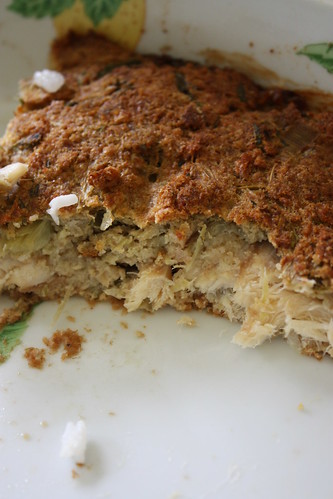
Petits carrés au chocolat - Small chocolate bites
250g de sucre - 9 oz sugar
125g de beurre - 4,5 oz butter
250g de chocolat noir - 9 oz dark chocolate
6 œufs - 6 eggs
250g de noisettes en poudre - 9 oz ground hazelnuts
100g de farine - 3,5 oz flour
1 cs de quatre-épices - 1tbsp mixed spices (ginger, cinnamon, cardamom, ground clove...)
4 cs de cédrat confit coupé en (petits) dés - 4 tbsp finely diced succade (candied citron)

Faire fondre au micro-ondes le beurre avec le chocolat (ça prend quelques minutes à moyenne puissance). Bien mélanger. Ajouter les épices, la poudre de noisette, le sucre, mélanger encore. Incorporer les œufs, puis la farine. Pour finir ajouter les fruits confits.
Verser dans un grand moule recouvert de papier cuisson. La pâte doit faire un centimètre à un centimètre et demi d'épaisseur environ. Enfourner à 180°C pour 30 à 40 minutes. Une fois refroidi, sortir du plat et découper en cubes.

Place the butter and roughly chopped chocolate in a bowl an dmicrowave on medium-heat for a few minutes, until the chocolate is melted. Stir. Add the spices, sugar and ground hazelnuts, stir some more. Add the eggs, then the flour, and lastly the candied citron.
Pour into a large dish lined with baking paper - the batter should be no more than half an inch high. Bake at 360°F for 30 to 40 minutes. Once it had cooled down, take the cake out of the dish and cut it into dices.

mardi 3 décembre 2013

Petits gâteaux à l'anis

Et on continue sur la lancée des petits gâteaux de Noël à préparer bien à l'avance - si l'on ne veut pas s'y casser les dents. Quelques petites mises en garde avant de commencer :
  • il leur faut deux bonnes semaines, plutôt trois MINIMUM pour ramollir un peu ;
  • la recette permet de faire un peu plus de cinq plaques à pâtisserie de gâteaux, mieux vaut prévoir, ou les faire en deux fois ;
  • la poche à douille et moi, on est pas copains, mais c'est un peu obligatoire pour cette recette ;
  • utiliser du papier cuisson ou des tapis silicones est absolument nécessaire. Croyez-moi, j’ai fait l'erreur cette année de faire confiance à la seule plaque graissée, je ne le ferai plus. JAMAIS.
On we go with Christmas cookies. These little anise cookies need a few good weeks to soften a little - they are hard when they get out of the oven. Three weeks is good.  Also, please use baking paper of silicon sheet and don't ever trust a simple greased plate for those. Trust me, I tried. The recipe give syou enough dough for a little over 5 pastry sheet, so either be prepared to store them or make several batches.
IMG_7504Anisplätzle
4 oeufs - 4 eggs
250g de sucre - 9oz sugar
1cs de sucre vanillé - 1tbsp vanilla sugar
1 pincée de sel - 1 pinch salt
2 cs d'anis en poudre - 2 tbsp ground star anise
300g de farine - 10,5oz flour

Battre les blancs d'oeuf en neige.
Mélanger les jaunes et le sucre, incorporer les blancs en neige.
Mélanger la farine et les autres ingrédients secs, les incorporer petit à petit dans la pâte.
Transférer la pâte dans une poche à douille et faire de petits point sur du papier sulfurisé ou un tapis de cuisson en silicone Faire de petits points bien espacés : ça s'étale et ça gonfle à la cuisson.
Laisser sécher les biscuits toute une nuit. Enfourner 13 à 15 minutes à 160-180°C. Les biscuits doivent rester blanc,s si ils commencent à dorer au bord il faut vite les enlever et cuire un peu moins la fois suivante. Le temps et la température de cuisson vont varier selon combien ils auront séché (17 minutes l'an dernier, 13 cette année pour moi, à 165°C), donc commencez doucement et surveillez bien jusqu'à avoir le bon réglage.

Beat the egg whites into foam.
Beat the egg yolks with the sugar and vanilla sugar. Fold into the egg whites. Add the remaining ingredients little by little, being careful not to break the foam.
Transfer the dough into a pastry bag and make small, well spaced dots on the baking sheet/paper. Don't make them too close as the dough flattens and gains a little in volume in the oven. Leave to dry overnight.
Bake for approx. 15 minutes at 320 to 340°F - the exact time and temperature will depend on how dry your cookies are, so be sure to start low and check regularly. The cookies should stay white !

lundi 25 novembre 2013

Grandes manoeuvres et petits gâteaux secs

PfaffenkäpchenJe m'aperçois avec surprise qu'il y a un gros manque sur ce blog. c'est d'autant plus étonnant que c'est la première, la toute première chose que j'ai cuisinée seule !
J'étais en troisième, et notre prof d'Allemand, pour nous faire découvrir un bout de culture germanique, nous avait distribué une page A4 de recettes de Plätzle, petits gâteaux de Noël - avec la perspective motivante d'un goûter en classe la dernière séance avant les vacances. J'avais fait les gâteaux. J'avais aimé. Ma famille avait aimé. Ma mère, qui en faisait encore quand j'étais plus petite, a alors exhumé une mince livre de recettes de Noël dans la langue de Schiller.
Le livre était neuf à l'époque. La même année, je me suis rendue compte qu'il ne le resterait pas. Je l'ai soigneusement recouvert, mais les outrages du temps et de la cuisine ont quand même eu raison de ses entrailles, qu'il perd maintenant aux quatre vents. J'ai de la chance, je n'ai jamais perdu de page, et je continue de tester régulièrement de nouvelles recettes issues de ce petit livret. Depuis le temps, il est peut-être temps que j'en transmette quelques-unes.

Alors attention, petit disclaimer : ce ne sont pas les biscuits qu'on prépare la veille pour le lendemain. Ces délicieux petits gâteaux secs, dans leur immense majorité, se préparent plusieurs semaines à l'avance, et se rangent dans des boîtes métalliques le temps de ramollir doucement et de prendre en arôme.

I can't believe I still haven't posted about Christmas cookies ! I have been hooked into making those for over 15 years now, using the same old battle-worn recipe book as a source, maybe it is time I pass on some of those.
But beware ! For those cookies to be at their best, you should prepare them a few weeks in advance (4 weeks is a good rule of thumb) and store them in a metal box until Christmas).

IMG_0449Cette année, la valse des petites gourmandises germaniques a commencé par des petites choses qui sont en théorie en forme de patte d'ours, sauf que je n'ai pas de moule adéquat, et que le nom est donc un poil usurpé.

Bärentätzle
4 blancs d'oeuf - 4 egg whites
250g de sucre - 9 oz sugar
1 jus de citron - juice of 1 lemon
60g de chocolat noir râpé - 2 oz ground dark chocolate
1cc sucre vanillé - 1 teasp vanilla sugar
250g d'amandes en poudre - 9 oz ground almond

Battez les blancs en neige, ajoutez petit à petit le sucre tout en continuant de battre, puis incorporez un à un les autres ingrédients. Laissez reposer une heure.
Avec deux cuillères à café, déposez de petits pâtés de pâte sur un papier cuisson ou, comme sur la photo, un tapis en silicone (je viens de découvrir, c'est ré-co-lu-ion-naire !).
Laissez sécher toute une nuit. Au matin, cuire 20 à 25 minutes à 150°C. Décollez soigneusement du papier/tapis (le dessous doit être pour ainsi dire sec) et stockez dans une boîte métallique. Ceux-là peuvent se consommer de suite, même si ils gagnent en arôme au bout d'une ou deux semaines à mon goût.

Beat the egg whites into a stiff foam. Still beating, add the sugar. Slowly add the rest of the ingredients. Let the dough rest for one hour.
Using two teaspoons, form little blobs of dough onto a sheet of baking paper or, if you're like me who just discovered it, a silicon baking sheet. Seriously, this stuff is pretty nifty ! Leave the cookies to dry overnight.
In the morning, bake them for 20 to 25 minutes in a pre-heated oven at 300°F. Carefully remove the cookies from the baking paper or silicon sheet and store them in a tin box.
These cookies can almost be eaten right away, I tend to think they get better after a week or two.

mercredi 20 novembre 2013

J'ai vaincu le pâtisson !

Si vous êtes un lecteur assidu de ce blog, vous avez pu remarquer une vague tendance à user et abuser des cucurbitacées. Et encore, je vous ai épargné la purée de patidoux (pour cette fois).
Mais la pâtisson et moi, notre histoire n'a pas commencé sous les meilleurs auspices. Pourtant, je l'adore, le pâtisson, sa blancheur impeccable, sa forme de brioche, il a une tête de truc bon. Mais la pâtisson, c'est une tannée à peler - contrairement à ses copains le patidoux et la potimarron, il a la peau dure ! Et puis, après des essais plus ou moins foireux, j'avais trouvée une recette sympa... au roquefort et au vin blanc. Pas enfant-proof. Pas maman-proof. Retour à la case départ pour Monsieur Pâtisson.
Ensuite j'ai tenté une poêllée, avec plein de choses dedans pour rajouter du goût. Peu apprécié des enfants, encore moins de la maman - le pâtisson, en morceaux, ça passe pas, ne me demandez pas pourquoi. Et puis comme j'en avais fait une GROSSE poêllée et que j’aime pas gâcher, j'ai tenter de le mixer... et là ! Miracle ! La pâtisson, c'est BON !

So yay ! I defeated the pattypan squash ! If you have been following this blog, you might have noticed how much I love all types of squashes and pumpkins. This one... as much as I loved it visually, it took me some time to find a recipe I liked. There was one keeper for some time, but it involved blue cheese (now bad for me) and white wine (bad for the wee ones). Next I tried to sauté it, and I hated it. But I had cooked a rather large batch and didn't want to waste, so I  grabbed the immersion blender, and lo and behold, a wonderful soup was born !

Velouté de patissonVelouté de pâtisson au jambon - Pattypan squash and ham soup
3 pâtissons - 3 pattypan squashes
4 tranches de jambon cuit - 4 slices ham
1 cc 1/2 de pâte miso - 1 teasp miso paste
1cc de paprika - 1 teasp paprika
1 brick de crème d'amande - 1 cup almond cream

Passez une heure à épépiner et peler le pâtisson. Courage, cela en vaut le coup.
Faites chauffer un peu d'huile dans une sauteuse et ajoutez le pâtisson et le jambon coupés en dés. Laissez mijoter à couvert à feu très doux pendant une heure en touillant de temps en temps pour éviter que cela n'attache, jusqu'à ce que le pâtisson soit fondant et translucide. Ajoutez la crème, le miso et le paprika. Transférez dans une soupière ou apparenté et mixez avec votre fidèle mixeur plongeant.

First and foremost, spend one solid hour prepping the pattypan squash. But it's all worth it in the end. Peel it, take the seeds out and cut it into small dices.
In a pan, heat one glob of oil, add the squash and the ham (cut into small squares). Cover and let it simmer on low heat for a good hour, stirring regularly. When the squash is tender and translucent, add the spices and almond cream. Stir, transfer into a more adequate container and mix until creamy. There, finally a pattypan squash recipe I LOVE !

samedi 26 octobre 2013

Purée de citrouille mutante - appl...-pumpkin purée

Allez, pour changer, une recette SANS amandes !
Il y a quelques jours, j'avais du boudin noir à la crème, mais... malheur ! pas assez de pommes pour une compote. Bon, par contre, j'avais de la citrouille, et une idée sournoise a germé dans ma cocotte-minute. Comment obtenir une purée qui se rapproche d'une compote de pommes acidulée (mais pas tout à fait), sans pommes !

A NUT-FREE rcipe for a change !
A few days ago, I had some blood sausage, but lacked the apples to make the compote to go with it. But... I had a slice of pumpkin, and a wicked idea. How to obtain a purée that has  little of the tanguiness of an appel compote, without apples !

IMG_0289Compote de citrouille-coings - Pumkin and quince compote
1 tranche de citrouille - 1 slice pumkin (enough to make a side dish for three, I honestly didn't weigh mine)
1 coing - 1 quince
3 patates - 3 potatoes
un reste de gras de canard (avec un peu de jus c'est meilleur) - some grease, butter is fine, but I had some leftover duck fat with a little meat juice, it was heavenly

Pelez et coupez en dés les pommes de terre et la citrouille. Frottez le coings jusqu'à ce qu'ils soient brillant, enlevez les pépins et coupez-le en dé. Faites cuire à la cocotte-minute une grosse vingtaine de minutes. Mixez avec un peu de matière grasse, gras de canard ou autre

Peel and dice the potatoes and pumpkin. Rub the quince until it is shiny, cut the core and seeds out, dice the flesh and cook it with the other vegetables in a pressure cooker - it takes about 20 minute suntil everything is cooked and soft. Add a little bit of grease and mix with your immersion blender.

lundi 21 octobre 2013

Tarte aux brugnons-plus-de-saison

Ben oui, il paraît que l'été, c'est un peu fini, et que les brugnons, ils sont plus très bons. Bon, sur notre marché ils n'ont pas été fabuleux de tout l'été, ce qui fait que je n'en ai pas beaucoup acheté. Les derniers, c'est le geek domestique qui les a ramenés, et au bout de 24 heures il fallait les manger ou les jeter. Oui mais manger des fruits pas très bons, moi, je m'y refuse. Donc voilà, j'ai une une idée. Encore une fois à base d'amandes, que vouez-vous, j'AIME les oléagineux, au risque de me faire traiter d'assassin par mes amis allergiques aux fruits à coques.
Pour étaler la pâte d'amandes au rouleau, on procède comme pour de la pâte à tarte, sauf qu'au lieu de la farine, on met du sucre. Beaucoup de sucre en poudre, dessus et dessous. La pâte d'amandes, toute imbibée du jus des fruits, donne juste le bon contrepoids au côté acidulé du brugnon, la semoule évite de détremper la pâte, c'est bon, c'est simple, je mets dans mon carnet (virtuel).

It appears summer has ended, and nectarines aren't quite in season anymore. They haven't been very good at our market all summer anyway, and I didn't buy that many of them. But lastly, the home geek (aka my husband) came home with a bunch of nectarines, and after 24 hours they had to be either eaten or tossed away. But I really, really don't like eating fruit that is not VERY god, so I came up with something. Once again, with nuts. I LOVE nuts.
To roll out almond paste, sprinkle your table top with sugar, and then sprinkle the almond paste itself with more sugar. The almond paste gets soaked with the nectarines' juices (yuuuuuuuum), and the semolina prevents the crust from getting muddy.

IMG_0194Tarte aux brugnons - Nectarine tart
4 brugnons - 4 nectarines
1 pâte brisée - 1 pastry dough
1/2 paquet (2 grosses cuillères à soupe) de pâte d'amandes - 2 large tbsp almond paste
de la semoule fine - fine grain semolina, about 2 teasp
du sucre - sugar

Préchauffez votre four à 180°C.
Etalez la pâte et foncez un moule à tarte beurré. Saupoudrez d'un peu de semoule.
Etalez la pâte d'amandes de façon à juste couvrir le fond du moule, et posez-là par-dessus la pâte à tarte.
Pelez et détaillez les brugnons en petits morceaux, disposez-les par-dessus la pâte d'amande, saupoudrez de sucre. Enfournez 40 minutes.

Preheat your oven at 360°F.
Roll out your dough and pat it into a greased tart mold. Sprinkle semolina on top.
Roll out the almond paste, so that it barely covers the bottom of the tart.
Peal the nectarines, cut them into slices and place them over the almond paste, sprinkle with a good dose of sugar. Bake for 40 minutes.

Enjoy !

mardi 8 octobre 2013

Truite aux amandes - Almond trouts

Cet après-midi, au moment de planifier le repas du soir, j'étais persuadée que les truites, ce serait rapide. Un tour dans la farine, et hop, cuites, servies. Vu le planning de la journée, sachant que j'étais à l'atelier jusqu'à 18h je récupérais les enfants à 18h15 pour les nourrir en théorie à 18h30 (oui, on mange tôt en général chez nous), c'était plutôt logique.
Sauf que des fois, j'ai des inspirations soudaines. Une envie soudaine de combiner truites + amandes. Mais pas juste en mettant des amandes dessus, non, et puis en fait, j'avais envie de les cuire au four (ça sent quand même moins le poisson dans la maison après). Et puis une chose en entraînant une autre, j'avais de l'hydromel entamé au frigo, et puis... voilà.


This afternoon as I started planning out tonight's meal, I thought the trouts would be a quick affair. On round in flour, one round in the pan, served and done ! Given I was busy at the print studio until six, supposed to pick up the kids at quarter pas six and feed them at half past six, this seemed like a reasonable plan.
And then I got ideas. I wanted almonds with my trouts. And I had mead in the fridge. And I wanted to cook them in the oven rather than on the stove (much less fish smell through the house). So, here it is.

IMG_0223Pour 4 truites - for 6 trouts
2 poignées d'amandes - 2 handfuls almonds
2 grosses gousses d'ail - 2 large garlic cloves
1 petit oignon - 1 small onion
1 brick de crème d'amandes - 1 pack (about 1 cup) almond cream)
2 cs d'hydromel - 2 tbsp mead
1 cc de moutarde - 1 teasp mustard
1 cs de miel - 1 tbsp honey

Torréfiez les amandes 5 à 10 minutes à four chaud. Laissez le four allumé.
Pelez et coupez grossièrement l'oignon et l'ail, hachez-les avec les amandes (un petit coup de blender ça marche bien).
Rincez les truites et disposez-les dans un plat allant au four. Répartissez la farce aux amandes à l'intérieur et un peu entre elles.
Dans un bol, mélange la crème d'amandes, l'hydromel, le miel et la moutarde. Versez par-dessus les truites. Enfournez 20 minutes.

Set the oven on hight and let the almonds get a little golden in it (about 5 to 10 minutes). Keep the oven on.
Peal and roughly hack the onion and garlic. Put them with the almond sin the blender and, well, blend. Not perfectly, I prefer to keep some crispiness to it.
Rinse the trouts and put them in an oven-proof dish. Stuff the trouts with the almond mixture. Put the excess stuffing between the trouts.
In a little bowl, whisk together the almond cream, mead, honey and mustard. Pour it over the fish. Cook in the oven for 20 minutes.

lundi 30 septembre 2013

Gratin de butternut-noisette

Parce que bon, on ne va pas faire des glaces en continu. Voilà arriver sur le marché les citrouilles, courges et autres coucourdes. Et dans notre jardin, les noisettes. Plein de noisettes. Oui, parce qu'en plus du prunier, nous avons aussi deux noisetiers. Et l'autre jour, j'ai eu envie de mélanger ces saveurs automnales.

So I hear autumn is finally here and ice cream season might be over soon. Pumpkins of all kinds have appeared at the market, ans we have hazelnuts in the garden. LOTS of hazelnuts. I decided I wanted to play with autumn's flavors, and I'm quite proud with how the experiment turned out !

Gratin butternut-noisetteGratin courge-noisette - Hazelnut butternut squash gratin
1 courge butternut - 1 butternut squash
5 grosses patates - 6 large potatoes
2 petits bricks de crème d'amande - 1 1/2 cup almond cream
1 cc de cannelle - 1 teasp cinnamon
1 cc de baies roses - 1teasp pink peppercorn
1 petite poignée de noisettes décortiquées - 1 small handful hazelnuts (without the husk)
1 pincée de gingembre - 1 pinch ground ginger
2 pincées de cumin - 1 pinch ground cumin
1 cup d'emmental râpé - 1 cup grated cheese

Préchauffer le four à 180°C.
Peler et couper en dés la courge et les pommes de terre. Les faire cuire à la cocotte minute. Beurrer un plat à gratin et y disposer les dés de légumes cuits.
Mettre les noisettes et les baies roses dans le blender, réduire en poudre, ajouter les autres épices et blender encore un peu pour bien mélanger. Ajouter la crème d'amande et donner encore une ou deux pulsations. Verser sur la courge et la pomme de terre, mélanger un peu à la fourchette (pas trop, sinon on obtient une purée).
Couvrir de fromage râpé et enfourner une vingtaine de minutes.

Preheat the oven at 360°F.
Peel and dice the squahs and potatoes. Cook them in the pressure cooker and place them in a greased gratin dish.
Place the hazelnuts and pink peppercorn berries in the blender and blend into a coarse powder. Add the other spices, blend a little more, then the almond cream and give it a few more pulses to make sure everything is well blended together. Pour the cream over the sqaush and potatoes, turn the mix a little (be carful not to overmix it, you don't want a purée).
Cover with grated cheese and bake in the oven for 20-ish minutes.

Voilà, les baies roses, c'est un peu mon dernier dada, grâce à une amie qui m'en a apporté des importées direct de Madagascar. Jusqu'ici, je ne trouvais pas que ça aie vraiment un grand intérêt, mais là... c'est juste la bonne saveur un peu fumée, épicée mais pas trop, je commence à en mettre un peu partout...

Pink peppercorn is my latest obsession. I didn't really think much of it until a friend gave me some that came straight from Madagascar, and now, I put it into almost everything !

mercredi 25 septembre 2013

Glace rhubarbe

Une fois qu'on a mis le doigt dans l'engrenage, impossible de revenir en arrière, tout passe à la sorbetière : prune, vanille, chocolat, chocolat-banane, melon, coco-citron-vert... et ma préférée ou presque : la rhubarbe. A savoir que je suis une fan inconditionnelle de rhubarbe. Et la seule dans mon entourage, et c'est tant mieux : y en a plus pour moi ! Cette glace, je la voulais bien crémeuse, du coup j'ai fait un entorse à mon régime sans lactose, et mon organisme ne sen est pas plaint, youpi !

Once we went down the rabbit hole of ice-cream making, there was no going back. There was plum ice-cream, vanilla ice-cream, chocolate ice-cream, chocolate-banana ice-cream, cantaloupe ice-cream, lime-coconut ice-cream...  and lastly, my favorite : rhubarb ice-cream. I love, love, LOVE rhubarb... and I'm the only one in the family to do so ! All the better, there's more for ME ! I wanted this ice-cream veyr creamy, so I added a little bit of real diary cream... and it worked, and it didn't make me sick, yay !

Glace rhubarbe
Glace à la rhubarbe - rhubarb ice-cream
1 poignée de tiges de rhubarbe - 1 handful rhubarb stalks
5 cas de crème épaisse (au moins 35% de matière grasse) - 5 tbsp diary cream (at leat 35% fat)
1/2 verre de sucre - 1/2 cup sugar

Lavez et coupez la rhubarbe en tronçons, mettez-là dans une casserole avec le sucre et faites cuire jusqu'à... ce que ce soit bien cuit, version purée. Vérifiez et corrigez si nécessaire le dosage du sucre. Faites refroidir. Passez au blender.
Battez en chantilly la crème (les 35%, c'est parce que sinon ça ne va pas monter). Incorporez la purée de fruits bien froide.
Mettez dans votre sorbetière et laissez tourner 30 à 40 minutes. Transvasez dans un récipient ad hoc.

Wash and dice the rhubarb stalks, put them in a pot witht he sugar and cook until tender. Check the sugar and add some if necessary. Let it cool. Blend.
Whip the cream (if it doesn't contain enough fat, it will stay liquid, and whipped cream will make your ice-cream lighter and fluffier). Gently add the (really cold) rhubarb mix.
Pour into you ice-cream maker and let it turn for 30 to 40 minutes, then pour it into your ice box and place it in the freezer.

Et voilà, je reprends doucement un rythme de publications plus régulier sur ce blog. Et je vais essayer de le tenir, promis ! Je traduis doucement les pages, et avec le temps j'espère traduire aussi les recettes précédentes... et bien sûr vous en présenter tout plein d'autres !!!

vendredi 20 septembre 2013

Guaca-truc - Guaca-thing

Bon, je savais que c'était risqué, des avocats sur notre marché, en ce moment... c'est pas l'idéal on va dire. J'ai fait le pari de les prendre pas mûrs et d'utiliser le voisinage de pommes pour pallier à cet inconvénient. Ben laissez-moi vous dire que ça marche vraiment mieux avec les bananes. Une semaine après, les avocats étaient toujours aussi verts et aussi durs, mais avec un goût qui lui commençait à tourner vers le un peu trop mûr. Bref, pas fameux.
Consulté en urgence, mon blender a accepté de s'en charger, mais quand même, ce n'était pas assez bon pour des avocats, même à guacamole. D'un autre côté, j'avais des tomates qui criaient. Et puis quelques épices et aromates, il faut bien.

I knew it was a bit risky, buying avocados at our local (cheap) market this time of the year... let's say it isn't ideal. I took a gamble and hoped the unripe  avocados would ripen next to the apples. Turns out bananas are better at this job. One week after I brought them home, the poor sad avocados were as green and hard as ever, but starting to develop a slight overripe taste.
Not daring to turn them into a regular guacamole, I took out the blender, some also overripe roma tomatoes that were lingering in the pantry, and my spice rack - because honestly, what would I do without it ?

Presque un guacamoleGuaca-truc - Guaca-thing
3 avocats - 3 avocados
3 tomates roma bien mûres - 3 Roma tomatoes
1 gousse d'ail - 1 garlic clove
1 cac de tamari - 1 teasp tamari
1 cac de vinaigre de cidre - 1teasp cider vinegar
2 pincées de sel - 2 pinches of salt
1/2 cac de baies roses - 1 teasp pink peppercorn

Lavez les tomates, pelez l'ail, coupez le tout en gros dés et passez au blender... et voilà ! Une petite entrée, à consommer en dip ou sur un peu de pain frais. Et mes avocats ont été sauvés !

Wash the tomatoes, peal the garlic glove, roughly dice everything and blend with the spices and liquids...  And... that's it ! It's probably one of the easiest and fastest recipes Iever made, and my avocados did turn out great !

dimanche 15 septembre 2013

Bête comme Quiche

C'est un classique familial. Chez nous, on l'appelle "quiche Catherine", souvenir d'une Catherine depuis longtemps perdue de vue, qui est je suppose à l'origine de la recette. C'est la plat parfait pour une entrée ou un plat unique quand on est à la bourre, en panne d'imagination, ou avec de petits restes.

This recipe is a family classic. We use to call it "quiche Catherine", after a Catherine we've long lost contact with. It's a really simple, really basic dish, it can be either an entrée or a main course, it's perfect for a tired weekday evening as well as for using up those small leftovers in the fridge.

IMG_9447
Quiche Catherine
5 oeufs - 5 eggs
3 petits verres de lait d'avoine - 3 cups oat milk
3 grosses cuillères à soupe de farine - 3 (large) tblsp all-purpose flour
1 paquet de lardons - a few bacon slices
1 poivron vert - 1 green bell pepper
1 poivron rouge - 1 red bell pepper
1 oignon - 1 onion

Préchauffez votre four à 180°C.
Dans une poêle,  faites revenir les lardons. Ajoutez très rapidement les oignons émincés et les poivrons coupés en petits cubes. Laissez dorer les lardons et fondre l'oignon.
Pendant ce temps, battez dans une jatte les oeufs avec la farine. Ajoutez doucement (sinon ça va faire des grumeaux) le lait d'avoine.
Graissez un poule à tarte, étalez dedans la garniture, puis versez la pâte par-dessus.
Enfourner 30 à 40 minutes, jusqu'à ce que le dessus commence à dorer.

Preheat your oven at 360°F.
Cut the bacon slices in smallish bits, put them in a hot pan, adding the minced onion and diced peppers as soon as there's a little grease in the pan. Cook until the bacon is golden and the onion soft.
In a mixing bowl beat the whole eggs with the flour, slowly add the oat milk.
Grease your mold (the flatter the mold, the better), transfer the bacon and vegetables into it. Pour the batter over them.
Bake for 30 to 40 minutes - until the top gets slightly golden.

Ce qu'il y a de merveilleux avec les quiches, c'est qu'on peut les faire à tout. Un reste de courgettes sautées ? Du saumon fumé ? Des épinards ? Un bout de fromage un peu trop "caractériel" ? Ca y va !
Ce qu'il y a de merveilleux avec ce plat, c'est qu'on n'a même pas besoin de faire de pâte (mais riend ne vous empêche d'en faire une, ou de prendre un pâte feuilletée du commerce, c'est bon aussi), du coup, c'est vraiment très, très rapide à préparer.

Now the great thing aoubt quiche is that you can just put about anything into it. Leftover sautéed zucchinis ? smoked salmon ? Spinach ? Goat cheese ? It all goes in !
And the other great thing about this one it you don't even have to make a proper pie crust - of course, you can make one, it you really want to, or use a ready-made puff pastry dough, it works really well, too.

vendredi 13 septembre 2013

Plummylicious

Quand on a acheté la maison, on n'a pas vraiment regardé ce qui poussait dans le jardin. Mais le prunier, c'est un chouette bonus ! C'est un prunier plus ou moins sauvage, qui s'est planté tout seul tout contre le mur du garage, et qui nous inonde de fruits sucrés dedans, avec une peau un peu acides, tous les mois de juillet/août (surtout août cette année. L'an dernier, on en a ramassé plus de 70 kilos ! Cette année a été un peu moins prolifique et nous un peu moins déterminés à faire de la prune à toutes les sauces, mais quand même, il y a eu plein de (gros, très gros) crumbles.
Et puis on a acheté une sorbetière (c'est la faute à Grenadine !), alors on a fait de la glace à la prune... Et vous savez quoi ? La glace à la prune, c'est tellement bon que je me demande pourquoi on en trouve pas en magasin.

We have this old plum tree that grew in a little nook in front of the house. It's a wild thing, nobody planted it there, it just appeared. Last year we harvested around 155 pounds of plums. They are sweet and a greenish yellow on the inside, with a red-blue skin that gives a good punch of acidity. They are okay raw, and delicious cooked.
This year, we had a lot of rain and cold in the spring, and the plums are late, and from what we see, we won't get as much of them as last year. Which is good, as I don't want to make much more jam and all the visitors who left our house last year with 10 kilos each have come and gone before the fruit was ripe.
But we bought an ice cream maker. And let me tell you, our plums make a FABULOUS ice cream.

Glace à la prune - Plum ice cream (vegan)
500g de petites prunes rouges prunes - 1 pound small red plums
100g de sucre  (à moduler selon le sucre contenu dans les fruits)- 1/2 to 1 cup sugar (adapt depending on how sweet or acid the plums are)
1 brique de crème de soja (j'étais à corut de crème d'avoine) - 1/2 cup soy cream (because I was out of my favorite oat cream)
1 pincée de gomme de guar - 1 pinch  guar gum

Lavez et dénoyautez les prunes. Si vous voulez limiter l'acidité, pelez-en tout ou une partie. Mettez-les dans une petite casserole avec le sucre et faites cuire jusqu'à obtenir une purée de fruits. Ajoutez la crème, vérifiez le dosage du sucre et adaptez si besoin. Passez au blender. Ajoutez la gomme de guar.
Laissez la purée de fruit refroidir une ou deux heures. Quand elle est bien froide, versez-là dans la sorbetière et faites tournez une bonne demie-heure (à moduler selon les capacités de votre sorbetière, bien sûr, la nôtre c'est le modèle ultra-de-base). Voilà !

Wash and stone the plums. Put them in a saucepan with the sugar, and cook until the fruit gets mushy. Add the soy cream. Blend until creamy. Add the guar gum.
Let the fruit purée cool for a solid hour in the fridge. Basically, make sure it is already cold when pouring it into the ice cream maker. Let the machine turn for 30 minutes-ish, depending on how fast yours processes ice (ours is a slow, very basic and cheap one). Voilà !

IMG_9998Now you "might" have noticed I added the french version here. Yup, I am going to try and make this a bilingual blog. Wish me luck. The downside of this ? I lost the picture of my pretty ice-cream. I took it, and I just lost it. And I don't really want to eat another bowl of ice-cream just to take a picture... So I give you some lovely flowers and leaves my kids picked up on the way home this morning.

Comme vous l'aurez remarqué, voilà, j'ai ajouté une version française, et je vais essayer de continuer en mode bilingue, si ça ne me bouffe pas trop de temps. Souhaitez-moi bonne chance !
La photo ? La photo, c'est malheureux à dire, je l'ai perdue. Prise, et égarée sur un disque dur quelconque. Pour éviter le post sans photo, que quand même ce serait mal, j'ai un jolie petit bouquet automnal cueilli par mes mini-trolls ce matin en rentrant de l'école. On peut même arguer que la moitié de ces éléments pourraient se manger !

dimanche 7 juillet 2013

Pork tenderloin in tapenade crust

This is a combination recipe. First, there was a pork tenderloin cooked by a dear friend’s mother, using store-bought tapenade. I love tapenade, I love olives, and I adored the dish. On the other hand, I had my trusty almond tapenade recipe, ready-made tapenade tends to be expensive (and very salty), I rarely have it at hand, while olives and almond paste are staple ingredients in our pantry.
This is the recipe exactly how I made it this time, I don't always stick to these proportions - it is a VERY forgiving recipe, you can pretty much eyeball everything and never get it wrong.

IMG_9143Port tenderloin in tapenade crust
2 pork tenderloins
1 cup green olives
1/2 cup black olives
1 cup white almond butter
olive oil
IMG_9146Preheat your oven at 360°F.
First, make the tapenade. Rinse the olives, and, using your trusty immersion blender (don't know what I would do without this one !), mix them into a paste, adding olive oil until it is very creamy. The fat from the oil will prevent the crust from getting to dry in the oven.
When you're happy with your tapenade (taste it, but don't eat it all ;) ), spread some of it on one side of the tenderloins. Turn them over, and spread the rest over them. Bake for 30 minutes in the oven, serve.
If, like today here, it is very hot where you live and eat, you might be happy to know the dish is also very tasty served cold.

vendredi 26 avril 2013

Aline's fish cakes

Okay, so there has been some improvement on the posting frequency - twice a month instead of every six months. In my defense, I have been very, very busy with work. To toot my own horn, there are many projects in the works over there at Green Martha - you are welcome to check out the website and the shop. One of the things that happened was the opening of my first (yay !) exhibition. The tea shop provided drinks and sweet things to munch on, and I made the savory stuff. I made everything bite size (thanks to my silicon molds) - it's cuter and I didn't need to cut it for the opening.
Unfortunately, in the blur of everything I had to get ready, I only snapped a picture of one of the appetizers I made.
IMG_8405Aline's fish cakes
1 cup canned tuna
1 cup canned salmon
6 eggs
1/2 cup oat cream
2 tbsp flour
1 small can tomato paste

Preheat your oven at 360°F.
Beat the eggs, add the flour, cream, the fish (shredded into small bits with a fork), the tomato paste, a pinch of black pepper.
Pour into small silicon molds, bake for about 20 minutes, until the cakes are firm and slightly golden.

This recipe originally came from a family friend, Aline, and included regular cream and grated cheese. One of the things I learned when going dairy free is that fortunately, a lot of savory cake recipes actually function just as well without cheese.
And yes, I've just posted three fish recipes in a row. I promise I'm going to mix things up a little more with the next few posts !

lundi 22 avril 2013

Salmon-broccoli crumble, or how I broke my food processor (but it was worth it)

Well, it it not entirely broken. I can still make it work using a long stick and some fiddling around its insides. Which is good, given it gave up the soul when I had just started cooking today's lunch. I had broccoli int he fridge, and smoked salmon, in quantities that fit a lunch for one adult, two kids and some leftovers (always, always make leftovers, that's my motto) I looked around a bit. I didn't want to make a simple broccoli purée (the kids had pumpkin soup the day before, they need to use their teeth now and then), quiche sounded boring. I had Grana Padano in the fridge, too (like parmesan, but cheaper and good enough for cooking with it). And this is what I came up with.


Salmon & Broccoli crumble
3 broccoli heads
1 cup oat cream
2 large smoked salmon slices
1/2 cup breadcrumbs
1/2 cup hazelnuts (or just a little more)
10,5 oz Grana Padano/parmesan
2tbsp butter (or substitute of choice)
ground black pepper

Rinse the broccoli ; cut off the hard part of the stem, separate the heads into small chunks. Cook in the pressure cooker for 15 minutes. Drain the broccoli and place it in a greased gratin dish. Pour the oat cream over it and roughly squash the broccoli with a fork. Place the smoked salmon over the mix so that it covers the broccoli.
Preheat your oven at 380°F.
If your food processor is sturdier than mine, use it to ground your cheese. When in doubt, resort to a manual cheese grater, you'll avoid plastic bits flying across the kitchen and the fiddling-with-a-long-stick to make the food processor work again. Do use the food processor to roughly ground the hazelnuts. Add the breadcrumbs, cheese and butter. Process briefly until all ingredients are mixed. Spread the crumbly mixture over the salmon.
Bake for 10 to 15 minutes, until the crust becomes golden.

This was, however, a bummer with kids. The big one decided he did not like salmon this way, which is still a mystery to me as he adores salmon every other possible way.

mardi 9 avril 2013

History junkie - Poisson en croûte

The biggest part of my time is not spent in front of the stove, but in my almost-a-workshop, where I work with ink, paper, fabric and thread - not always together. One of "my" areas is historical costuming, more specifically (yes, I am very specialized... in a number of various domains) the late victorian to early edwardian era, roughly 1870 to 1900. On the other hand, I love books, especially old books. And images, I love images (well, I am a graphic artist after all). Which leads me to my point : I collect bound editions of late nineteenth century fashion magazines.
In case you would be wondering what this has to do with this blog, just open a modern "women's" magazine. browse the pages at the end. I bet you will find a cooking column. And guess what ? It was exactly the same back then.
The recipes are a weird mix to our modern concept of cooking - you will find endeavors most of us find too time-consuming to consider (canning, I'm looking at you), and very basic things. This busy mom is more inclined to try out the latest - as soon as it's not pizza with pasta on it (yes, I found the recipe for this. Carbs on top of carbs topped with carbs. No actual tomatoes included). I am only adventurous to a certain point. This one, I tried out once, and to is now a staple recipe - with a few modern conveniences. It works well with all the fishes I have tried - I would just avoid the small filets like red mullet.

Poisson en croûtePoisson en croûte - Fish in a crust
2 or 3 large fish filets - you need enough of them to almost fill your gratin dish.
1fennel bulb
1 small onion
1 cup breadcrumbs
parsley

Preheat your oven at 360°F. Grease your gratin dish. Place the fish filets at the bottom of the dish.
Place the fennel, rinsed and roughly diced, the peeled onion cut in four, the breadcrumbs (or stale bread if you don't have breadcrumbs ready) and the parsley in your food processor's bowl and process until no big lumps remain. Spread the mixture over the fish.
Bake until the crust is golden brown.

You can choose your own herbs and veggies mix to add to the crust, of course.
I usually have either stale bread at hand, when it starts to pile up too much and I don't feel like making brad pudding I just process it into crumbs and store them in an airtight container - ready to use, free breadcrumbs, and no waste !

Going nuts - Zucchini and tomatoes tart

IMG_6958This recipe was a casualty of this blog's hibernation, and of just too much happening in the rest of my life. I had it photographed, I wanted to post it, and then... I didn't post it right away. Winter came, and this definitely did not feel like a winter recipe, so I didn't post it either. But I've heard spring is scheduled to start soon (or has been so for a few weeks), and now this seems more season-appropriate.
It was another of those nut experiments I do now and then, when I crave something with fat diary cream and suddenly remember how bad of an idea that would be. The nuts of choice being, this time as often, hazelnuts from our garden (I hear your envy !). We collected them, opened them and roasted them lightly in the fall, and stored them in a metal box.

IMG_6963Zucchini and tomatoes tart
1 pastry dough
2 garlic cloves
1 handful hazelnuts
2 zucchinis
2 tomatoes
thyme, oregano
IMG_6959On the night before, place the hazelnut in a large glass with one or two cups of water.
Prepare the pastry dough, roll it out onto your greased form. Pre-heat the oven at 360°F.
Drain the hazelnuts - but keep about half a cup of the water. add the peeled garlic cloves and mix until you get a thick, not still slightly crumbly paste. Add a little water back if necessary. Spread the paste onto your dough.
Thinly slice the vegetable and place them over the nut paste. Fold the excess dough back over them.
Bake for 40 minutes to one hour (the vegetables tend to stay crispy).
IMG_6961 IMG_6962
And before I disappear again under a mountain of fabric and ink, here's a link to a fantastic french cooking blog : Goûte,j'ai testé un truc !

mardi 5 mars 2013

Potée - cabbage soup with sausages

I'm cheating - my husband made this one. But since it's not technically one of his devoted areas of competence (like cream puffs, for example), I'm still going to post it on my blog.
Potée basically means "that you put in a pot". You take vegetables and meat, and cook them together in water, et voilà ! The basics for this one are cabbage, and sausages. All kinds of sausages, we like to mix different ones, smoked and not smoked, and a few bacon strips. Now I know I said I'm not a big fan of cabbage - and here I am typing two cabbage recipes in a row - the good part about theses two recipes is : they don't taste too cabbage-y for me. The dear home geek achieved this by balancing the cabbage with other vegetables. It was perfect. We don’t usually put potato in our potée, and from now on I think we will. He used potatoes that we normally keep for fries and sauté-ing, of the firmer kind, and it was a good choice as they kept some of their shape even after cooking.

Potée
1/2 white cabbage
8 carrots
5 potatoes
8 sausages (or more)
Dijon mustard

Preheat a large steel pot and cook the sausages until golden.
Peel and chop your vegetables - like, really thinly. Add them to the pot and generously cover with water. Let the potée simmer for at least an hour.
Serve hot, adding just a little touch of mustard to the plate.

Now, to make this post funnier, I thought we would reheat leftovers, cook some more sausages, just add a little more water and small soup noodles. Except our soup noodles had been invaded by some unwanted guests and got thrown out right after I added the new sausages and the water. I tried to add rice, but realized, again, after adding it, there was not enough for all of us. So I added rice and green peas. It took ages to cook instead of the quick reheating I had originally envisioned but it was delicious. I think I need to experiment with rice and soups some more. But that requires buying a new bag of rice, right ?

vendredi 1 mars 2013

Knob celery and Chinese cabbage soup

Winter is for soups. It's cheap, it's easy to make, it reheats well and it works fabulously with most winter vegetables. And the kids love it. Yes, they even loved this one, although getting them to eat cabbage or knob celery in another preparation can be... tricky.
As I previously mentioned, I tend to add some potatoes to any soup, just for the texture, and a little stock (beef or chicken) instead of salt. I don't make my stock from scratch, I'm mostly using stock powder, about 1 tablespoon at a time.
And yes, this is one of my pressure cooker recipes. Because pressure cookers make everything sooo much quicker. Prep time was 15 minutes, with 20 minutes cooking after that.

Knob celery and Chinese cabbage soup
1 medium knob celery
1 Chinese cabbage
2 onions
6 medium sized potatoes
chicken or beek stock powder

In your pressure cooker, preheat one small splash of your oil of choice. Peel and thinly slice the onions and sauté them with the oil. Rinse and chop the cabbage, leaving out the hard core, and add it into the cooker. Peel and dice the celery and the potatoes and add them too. Almost cover with water, add the stock powder. Cook for (about) 20 minutes. Blend into a creamy mixture with your immersion blender.
You will get a fairly thick soup, just add water (or milk, see below) to make it more liquid... and cool it down some.

Now "someone" (looks at her parents) has taught my kids that all soups need an addition of milk and cheese to be edible. Milk is a big no-no for me, so we used oat milk instead as usual. As for the cheese... sometimes, I do eat a little bit of it. This was Maasdam, and it was delicious with the soup.

Lastly, I just discovered this food blog, and oooh ! yummy ! I'm not at all into paleo eating, or losing weight, but the recipes look really, really yummy. I need to try the cacao and roasted hazelnut butter...

dimanche 17 février 2013

More pumpkin !

Yup, more pumpkin. There aren't that many veggies that I really like in winter. To be honest, I only enjoy endive in small quantities, and I'm not entirely a fan of cabbage either. The kids think more or less the same so...
I had some pumpkin left over from my last soup batch (because I had bought a LOT of pumpkin, and my pressure cooker is big but not THAT big), so I made some gnocchi for a change.

IMG_7960Pumkin gnocchi
1 slice pumkin
5 large potatoes
1 tsp ground cumin
4 eggs
3-4 cups flour
chicken or beef stock

Peel and dice the pumpkin and potatoes and cook them until tender in your pressure cooker. Once cooked, drain all water out and squash the potatoes and pumpkin together. Add the eggs and cumin,  and enough flour to get a dough that holds its shape (if you stick a teaspoon into it, it should stay vertical - I know, highly scientific method).
Take a large pot and bring your stock to boil in it. Using two teaspoons, drop little bits of dough into the boiling stock. When the gnocchi come up again and start floating on the surface, wait for about 40 seconds before taking them out. Repeat until all dough has been cooked into gnocchi. You can either serve them just as they're done or put them in a large, oven proof dish to reheat them, adding ground cheese, tomato sauce, etc... if you feel so inclined.

It does take a little time to make all the gnocchi - to give you an idea I started at 6PM and was done by 6:40. As it was a relaxed evening at home I was able to just serve the kids and make them eat between two rounds of gnocchi. And we have enough leftovers for tonight.

jeudi 14 février 2013

Not dead YET !

I know, I know, it's been stupidly long since I last updated. I don't even have a valid excuse for letting you all miss on the Christmas baking. Seriously, I'm that bad a blogger, sometimes.
To amend myself, I'm going to go with really simple today. No fancy Valentine thingie, just a simple soup that works wonders for the kids each and every time. Plus, it's in season.

IMG_7628
Basic pumpkin soup
1 pumkin slice
3-4 large potatoes, the kind that don't hold well when cooked
chicken or beef stock
1 pinch ground cumin

Peel and dice the pumpkin and potatoes. Put them in your pressure cooker with just enough water to not quite cover the vegetables. Cook for about 20 minutes, until the veggies are soft and squish-able.
Add the cumin and stock. With an immersion blender, mix everything until you have a smooth texture.
This usually gives you a rather hearty soup, I like to add a little bit of oat milk to make it more liquid - and to cool it down, too. My kids love a little bit of ground cheese with theirs. And then they lick their plates clean.

You don't need to be very precise with your proportions for this to work. The pumpkin is here for taste and color, and you need to add a little bit of potato to get a really smooth texture, that's all. I sometimes add some carrots as well.