mardi 5 mars 2013

Potée - cabbage soup with sausages

I'm cheating - my husband made this one. But since it's not technically one of his devoted areas of competence (like cream puffs, for example), I'm still going to post it on my blog.
Potée basically means "that you put in a pot". You take vegetables and meat, and cook them together in water, et voilà ! The basics for this one are cabbage, and sausages. All kinds of sausages, we like to mix different ones, smoked and not smoked, and a few bacon strips. Now I know I said I'm not a big fan of cabbage - and here I am typing two cabbage recipes in a row - the good part about theses two recipes is : they don't taste too cabbage-y for me. The dear home geek achieved this by balancing the cabbage with other vegetables. It was perfect. We don’t usually put potato in our potée, and from now on I think we will. He used potatoes that we normally keep for fries and sauté-ing, of the firmer kind, and it was a good choice as they kept some of their shape even after cooking.

Potée
1/2 white cabbage
8 carrots
5 potatoes
8 sausages (or more)
Dijon mustard

Preheat a large steel pot and cook the sausages until golden.
Peel and chop your vegetables - like, really thinly. Add them to the pot and generously cover with water. Let the potée simmer for at least an hour.
Serve hot, adding just a little touch of mustard to the plate.

Now, to make this post funnier, I thought we would reheat leftovers, cook some more sausages, just add a little more water and small soup noodles. Except our soup noodles had been invaded by some unwanted guests and got thrown out right after I added the new sausages and the water. I tried to add rice, but realized, again, after adding it, there was not enough for all of us. So I added rice and green peas. It took ages to cook instead of the quick reheating I had originally envisioned but it was delicious. I think I need to experiment with rice and soups some more. But that requires buying a new bag of rice, right ?

vendredi 1 mars 2013

Knob celery and Chinese cabbage soup

Winter is for soups. It's cheap, it's easy to make, it reheats well and it works fabulously with most winter vegetables. And the kids love it. Yes, they even loved this one, although getting them to eat cabbage or knob celery in another preparation can be... tricky.
As I previously mentioned, I tend to add some potatoes to any soup, just for the texture, and a little stock (beef or chicken) instead of salt. I don't make my stock from scratch, I'm mostly using stock powder, about 1 tablespoon at a time.
And yes, this is one of my pressure cooker recipes. Because pressure cookers make everything sooo much quicker. Prep time was 15 minutes, with 20 minutes cooking after that.

Knob celery and Chinese cabbage soup
1 medium knob celery
1 Chinese cabbage
2 onions
6 medium sized potatoes
chicken or beek stock powder

In your pressure cooker, preheat one small splash of your oil of choice. Peel and thinly slice the onions and sauté them with the oil. Rinse and chop the cabbage, leaving out the hard core, and add it into the cooker. Peel and dice the celery and the potatoes and add them too. Almost cover with water, add the stock powder. Cook for (about) 20 minutes. Blend into a creamy mixture with your immersion blender.
You will get a fairly thick soup, just add water (or milk, see below) to make it more liquid... and cool it down some.

Now "someone" (looks at her parents) has taught my kids that all soups need an addition of milk and cheese to be edible. Milk is a big no-no for me, so we used oat milk instead as usual. As for the cheese... sometimes, I do eat a little bit of it. This was Maasdam, and it was delicious with the soup.

Lastly, I just discovered this food blog, and oooh ! yummy ! I'm not at all into paleo eating, or losing weight, but the recipes look really, really yummy. I need to try the cacao and roasted hazelnut butter...

dimanche 17 février 2013

More pumpkin !

Yup, more pumpkin. There aren't that many veggies that I really like in winter. To be honest, I only enjoy endive in small quantities, and I'm not entirely a fan of cabbage either. The kids think more or less the same so...
I had some pumpkin left over from my last soup batch (because I had bought a LOT of pumpkin, and my pressure cooker is big but not THAT big), so I made some gnocchi for a change.

IMG_7960Pumkin gnocchi
1 slice pumkin
5 large potatoes
1 tsp ground cumin
4 eggs
3-4 cups flour
chicken or beef stock

Peel and dice the pumpkin and potatoes and cook them until tender in your pressure cooker. Once cooked, drain all water out and squash the potatoes and pumpkin together. Add the eggs and cumin,  and enough flour to get a dough that holds its shape (if you stick a teaspoon into it, it should stay vertical - I know, highly scientific method).
Take a large pot and bring your stock to boil in it. Using two teaspoons, drop little bits of dough into the boiling stock. When the gnocchi come up again and start floating on the surface, wait for about 40 seconds before taking them out. Repeat until all dough has been cooked into gnocchi. You can either serve them just as they're done or put them in a large, oven proof dish to reheat them, adding ground cheese, tomato sauce, etc... if you feel so inclined.

It does take a little time to make all the gnocchi - to give you an idea I started at 6PM and was done by 6:40. As it was a relaxed evening at home I was able to just serve the kids and make them eat between two rounds of gnocchi. And we have enough leftovers for tonight.

jeudi 14 février 2013

Not dead YET !

I know, I know, it's been stupidly long since I last updated. I don't even have a valid excuse for letting you all miss on the Christmas baking. Seriously, I'm that bad a blogger, sometimes.
To amend myself, I'm going to go with really simple today. No fancy Valentine thingie, just a simple soup that works wonders for the kids each and every time. Plus, it's in season.

IMG_7628
Basic pumpkin soup
1 pumkin slice
3-4 large potatoes, the kind that don't hold well when cooked
chicken or beef stock
1 pinch ground cumin

Peel and dice the pumpkin and potatoes. Put them in your pressure cooker with just enough water to not quite cover the vegetables. Cook for about 20 minutes, until the veggies are soft and squish-able.
Add the cumin and stock. With an immersion blender, mix everything until you have a smooth texture.
This usually gives you a rather hearty soup, I like to add a little bit of oat milk to make it more liquid - and to cool it down, too. My kids love a little bit of ground cheese with theirs. And then they lick their plates clean.

You don't need to be very precise with your proportions for this to work. The pumpkin is here for taste and color, and you need to add a little bit of potato to get a really smooth texture, that's all. I sometimes add some carrots as well.

lundi 16 juillet 2012

Evidences

In my family, cooking is a normal, natural part of the daily routine. All through her working career, my (now retired) mother even had a weekly cooking routine : she'd cook easy dishes that didn't need a lot of prep time through the week, then on Saturday morning my parents would go grocery shopping at the market, and on Sunday morning my mother would take over the kitchen, make something a little fancier than usual for lunch, and often cook a second batch, or another dish she would freeze for later. In the summer month and during the summer vacations, she'd buy cheap, almost too ripe fruit in bulk to make jam. I've seen her and my father's mother cook for so long it all seemed natural to me. Watching my other grandmother's nearly non-existent cooking habits should have made me realize that cooking might not be as natural but... no.
I nearly fell off my chair when I heard a girl my age didn't know how to make jam. And then again when I read a bunch of jam recipes. Why should things be so complicated ? Making jam is simple, if slightly time-consuming. But seeing as you make a year's jam supply with each fruity batch, the time issue becomes much more relative.
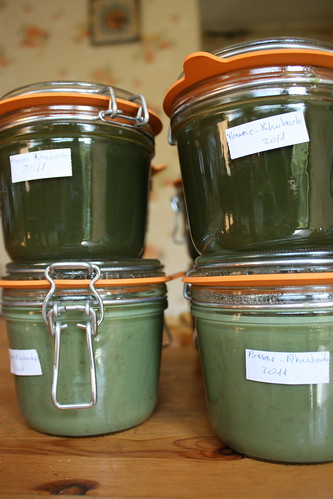
This is my mother's general recipes, the one we use to make strawberry jam, apricot jam, apple-and-rhubarb jam, apple-and-quince jam, plum jam, cherry jam. My mother just cuts the fruit into not-too-big pieces, I prefer to run a hand-blender through mine just before I put them into the jars.

A few things to consider
  • It does not take much longer to prepare 5 pounds of jam than just one, so as long as you're not experimenting with a new-to-you fruit or fruits combination, go ahead and make a big batch. Just make sure your cooking pot(s) is big enough and you have enough jars.
  • You will prepare the fruit and sugar in the evening, and cook the jam the next day.
  • Be sure to have (enough) jars clean, dry and ready when the jam is done. I leave them (and their lids) for 20 minutes in boiling water to sterilize them and then just let them air dry on a clean towel. If you're unsure about how many jars you'll use, prepare a few more.
  • The jars will be HOT right after you've filled them. I tend to schedule my jam-making for when I can leave them on the table to cool for a few hours afterwards (not too close to the table’s edge, so that the little fingers won't get burnt !)
  • Think about how you will seal your jars. I mostly use screw-on lids, depending on what jars I have at hand.
  • Pectin is often concentrated in seeds and skin. When making apple jam, I put the apple cores I have cut out into a small, closed cloth bag and let it cook with the jam.
  • You will need a LONG spoon (to reach the bottom of the cooking pot without burning your fingers), preferably of wood, to stir the jam and ladle to put it into the jars.
The trusty jam recipe
Wash, it necessary peel, stone, dice the fruit. Weigh it and place it in the pot you will use to cook it. Add the same weigh of sugar. Cover and let it sit for 8 to 24 hours, until a) you have time and b) there's a good quantity of juice in the pot.
Place a clean plate in your fridge.
Bring the pot over onto the stove, and turn the heat on. Once the jam is boiling, turn the heat down so that is keeps happily blubbering without overflowing. Stir regularly, all through the bottom of the pot to prevent the fruit from adhering to it. Check on your jam regularly to make sure it is not trying to escape from the pot (jams takes up a LOT more space when boiling and can overflow easily), stir some more. Do NOT cover the pot, as the water needs to evaporate - plus, the jam would run over pretty quickly.
Let the jam on the stove for 30 minutes to one hour. To check whether or not it is done, take the plate out of the fridge and pour just one drop of jam onto it. It should turn almost solid instantly and not run if you move the plate. If it does, let the jam cook for some more.
When the jam is ready, use a ladle to pour it into the jars. I re-use store-bought jam jars, pickle jars... and their lids. Right after I've filled the jars, I screw the lid on and turn the jar on its head (being careful not to burn my fingers !). I turn them back on their "feet" once the jam has cooled.
Label the jars (I write down what it is and when I made it) and store them in a cool, dry place. As long as they've been thoroughly cooked and well sealed, they can keep for some years.

De-bugging
Sometimes jam does not keep perfectly... It does not mean you need to throw that whole batch from last year away.
  • cristallization : sugar cristals, mostly on the surface of the jam, caused by too much sugar, overcooking it or storing it in a too warm place. Just add 1 or 2 tablespoons of boiling water to dissolve the sugar before eating the jam. And next time you make jam out of this fruit, use a little less sugar.
  • mold : it can happen if the jam hasn't been cooked enough. If it's just a little bit in one pot, carefully take it out, store the jar in the fridge and eat this jar first. If the whole batch shows mold, you will have to cook it again. Empty the jars in a pot, boil the jam again, clean the jars, etc.

dimanche 15 juillet 2012

To each their own...

... chocolate mousse recipe !
Every person I've met had their particular recipe. Some had tried half a dozen before they found the one they claimed was THE recipe. Well, I'm no exception, I have my own recipe as well, combined for my own taste from several others.
Actually, this is not just a chocolate mousse recipe. This is one of my staple recipes to use leftover egg whites. Because one can get tired of meringue and still want to have some home-made mayonnaise.


Spiced chocolate mousse with only egg whites
9oz dark chocolate
4 egg whites
1 tsp cinnamon
1 pinch ginger
2 tbsp sugar
1/2 cup almond cream

Beat the egg whites until they are very stiff (they are when you can turn the bowl upside down and nothing moves). Still beating, add the sugar.
Cut the chocolate into small pieces, add 2 spoons of water and slowly melt it in the microwave. Add the spices and the cream. Gently fold the chocolate into the egg whites (not the other way round !) and place the mousse in the fridge for at least 6 hours.

This one has to sit in the cold for quite some time to set. It stays a little creamy (especially at the end of the bowl), but very light. As a good rule of thumb, one egg white makes for one portion, so this should serve four guests.

Dip dip dip

It is hot here. The weather forecast keeps promising us rain... tomorrow. It's always "tomorrow". And it stays this way. In my quest for summer recipes that don't turn my kitchen into a sauna, I have turned to dips. I made a little more variety than usual as we had guests yesterday. There was the trusty guacamole, as well as the eggplant caviar, and then some more. I made another trusty preparation, almond tapenade from this blog, translated here for your convenience.

Clockwise from top left : eggplant caviar,
humus, tuna-hazelnut spread, tapenade
Almond tapenade
1/2 cup almond butter
1/2 cup green olives, pitted

Rinse the olives in running water, mix everything together. You can add more or less almond paste depending on your taste. If the tapenade is a little too thick, add a dash of olive oil.

Then I got a little bit more experimental, and I tried my hand at something I'd never done before : humus. I only had a can of chick pas. I'd have preferred the dry kind (as the humus turned out a bit salty for my taste), but well... you do with what you have.

Vegan humus
1 can chick peas (garbanzo beans)
1 cup oat cream
1 clove garlic
2 tbsp chopped fresh coriander (okay, it was frozen coriander, my usual seller wasn't at the market lately)
1 tbsp tahini

Blend together using your mixer until smooth.
I was not so convinced right out of the bowl, the taste was better after  few hours in the fridge. A lot better, considering how many servings the guests took.

Lastly I was craving something with salmon. But I had no smoked salmon, could not find any at the store I went to, and the smoked salmon spread recipe I had involved fresh cheese anyway.This is were I got very experimental, and I must say, it worked !

Tuna-hazelnut spread
1 1/2 cup whole hazelnuts
1 can tuna (8 oz or so)
1 cup oat cream
1/2 oat milk

In a mixing bowl, blend the hazelnuts into a fine power. Keep blending and let the hazelnut power get a little warm. Add the rest of the ingredients and keep blending until you get a smooth cream.

I served everything with grilled spare ribs, sticks of red bell pepper, cucumber, endive and fresh bread. It was very good and I had leftovers for the next day. I will definitely keep tweaking the humus and tuna recipes, I'm sure they can be improved. I'll edit this post if I turn to a better version.